You have no items in your shopping cart.
Blog / Building a Hydroponic System From Scratch: Inside Our 13 December 2025 Practical Session
Building a Hydroponic System From Scratch: Inside Our 13 December 2025 Practical Session
You can read about hydroponics for a week and still not know what a correctly soaked grow sponge feels like, or what number the meter should show before you plant anything into the tank. That gap between understanding a system and being able to run one is exactly what a practical session exists to close.
On 13 December 2025 our WSQ - Basic Urban Farming with Hydroponics learners built a complete deep water culture (DWC) system from an empty tub. This post follows that build in the order it happened, because the order is the lesson: each step sets up a condition the next one depends on.
Step 1: Soak the grow sponges and prepare the net pots
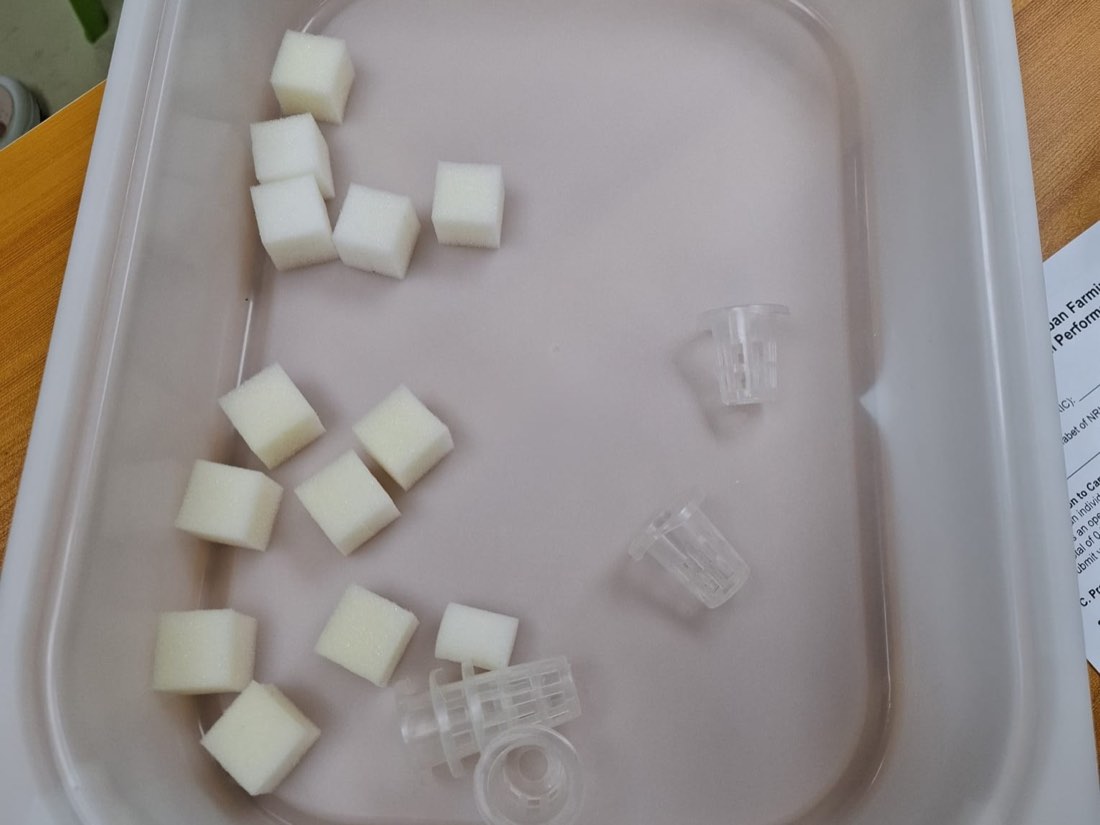
The build starts with the growing medium, not the plant. Those white cubes are phenolic grow sponges and they arrive dry and hydrophobic — drop a dry one into water and it will float on the surface, refusing to take up moisture. They need to soak until they are saturated all the way through and sink under their own weight.
This step gets rushed more than any other, and the cost is invisible until much later. A sponge that is dry in the middle leaves the seed with a pocket of air where it needed water, and germination simply fails — two weeks after the mistake, with nothing to point at. The other half of the job is squeezing out the excess before planting: a sponge that is completely waterlogged holds no air, and roots suffocate as surely as they dry out. Saturated but not dripping is the target, and it is a texture you learn by feel.
The clear plastic net pots soak alongside. Their walls are slotted rather than solid, so nutrient solution flows in and roots grow out through the sides — the pot holds the plant in place, and nothing else.
Step 2: Seat the sponges in the net pots
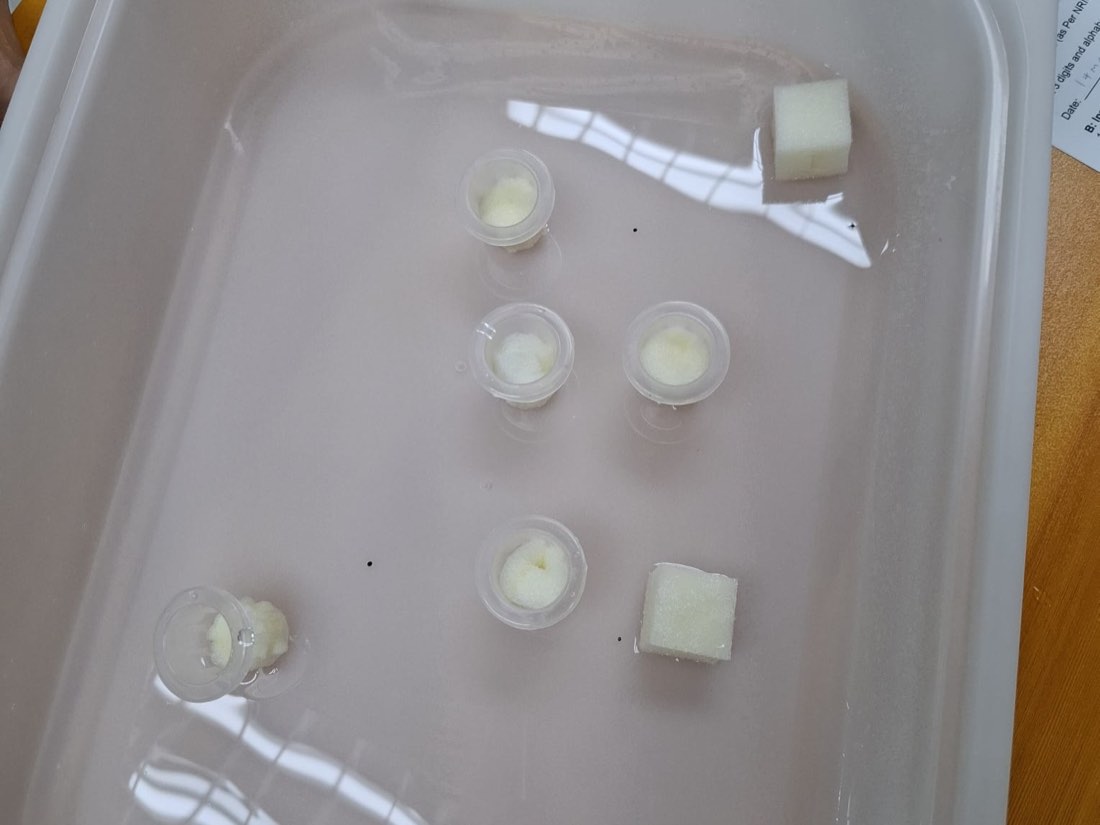
Each saturated sponge goes into a net pot, and the assembled pots go into the reservoir. It looks trivial. It is where two common failures get built in.
Seat the sponge flush with the base of the pot. If it sits proud, the gap beneath it becomes an air pocket and the roots have to bridge open space to reach the solution. Seedlings that stall for no visible reason are frequently sitting on a badly seated sponge.
Get the depth right. The bottom of the net pot should just touch the solution — close enough that the sponge wicks moisture upward continuously, but not so deep that the sponge is submerged. Too shallow and the seedling dries out before its roots grow long enough to reach down. Too deep and you have drowned it. In a mature DWC system the roots hang freely into the solution and only the very top of the medium stays damp; in the first days, before those roots exist, wicking is doing all the work.
Step 3: Mix the nutrient solution and measure it
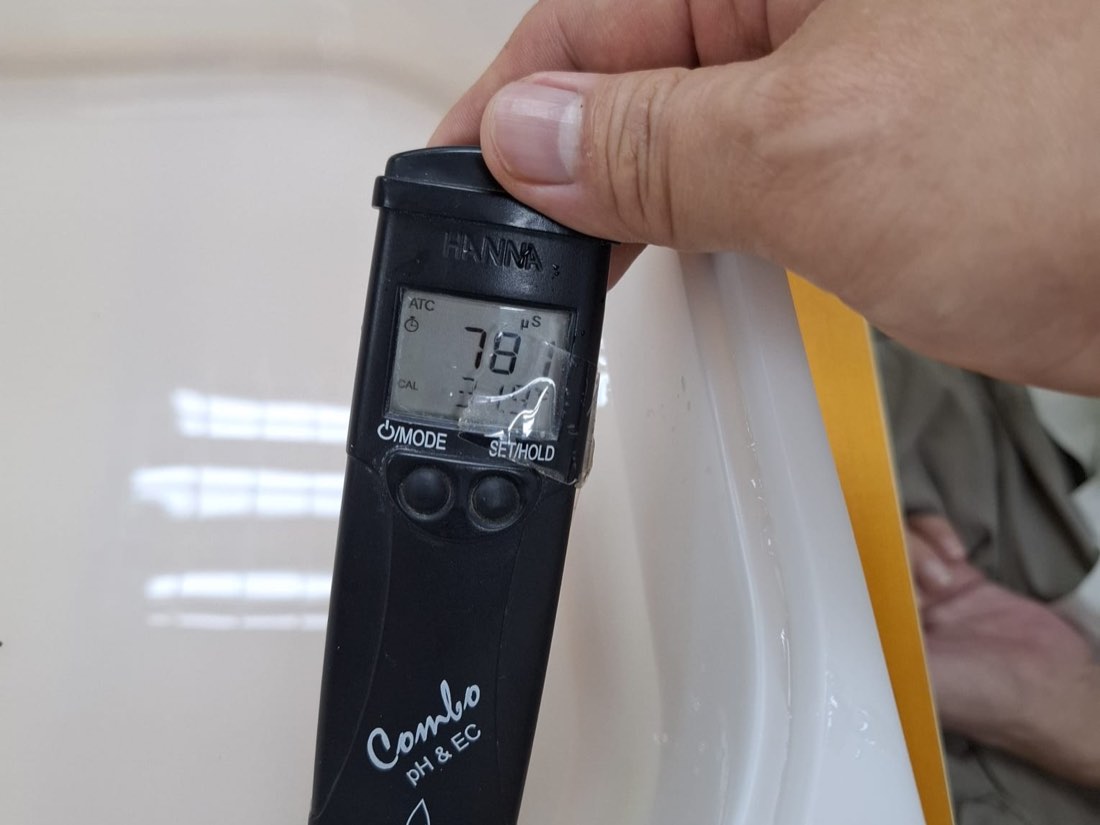
This is the heart of the session. The learners mix nutrient concentrate into the reservoir, then measure what they actually made rather than trusting what they intended to make.
The instrument is a combo pH and EC meter, and it reports the two numbers that between them describe the solution:
- EC (electrical conductivity), shown here in microsiemens, measures how much dissolved mineral salt the water is carrying — in practice, how strong the feed is. Plain tap water reads very low; a made-up leafy-green solution reads far higher. Watching the number climb as concentrate goes in is the moment the abstraction becomes concrete.
- pH decides whether the plant can absorb any of it. Most hydroponic crops want roughly 5.5 to 6.5. Outside that band, nutrients become chemically locked away: they are present in the tank, measurable on the EC reading, and unavailable to the plant. A grower can starve a crop in a full reservoir and, without a meter, never understand why.
Those two facts are why we hand people an actual meter instead of describing one. EC without pH tells you the strength of a feed the plant may not be able to use; pH without EC tells you the plant could absorb a solution that may be far too weak or too strong. You need both, and you need them regularly — as plants drink, water leaves faster than the salts do, so EC drifts upward and pH wanders on its own schedule.
Measuring is not a one-time setup task. It is the routine that keeps a system alive, and building the habit on day one is most of what separates growers who succeed from those whose second crop quietly fails.
Step 4: Mount the lid and set the planting sites
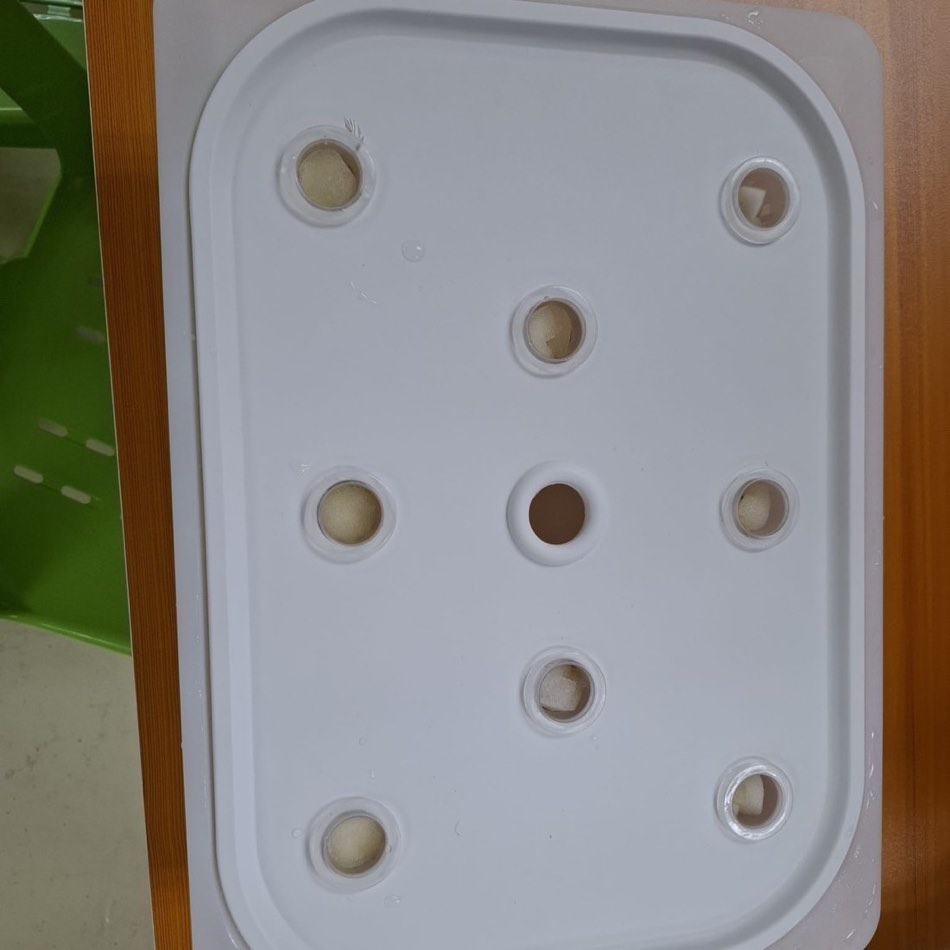
The lid is what turns a tub of nutrient solution into a hydroponic system. Eight planting sites sit around a central hole, and each element earns its place:
- The sites hold the pots at a fixed height, which is how the depth set in step 2 stays correct instead of drifting every time the tub is nudged.
- The lid blocks light from the solution. This is the one people skip, and it is the most reliable way to ruin a reservoir. Light plus nutrient-rich water grows algae, and algae competes with the crop for nutrients while fouling the water. A covered reservoir stays clean; an open one turns green within days.
- It slows evaporation, so the solution's concentration stays stable for longer — and stable concentration means the EC you measured is still roughly the EC the plants are getting tomorrow.
- The centre hole is the service point for topping up and for dropping the meter in, so you never have to dismantle a planted system to check on it.
Spacing matters too. Eight sites in a tub this size is generous for lettuce and herbs, which is deliberate: crowded leafy greens shade each other, trap humidity between leaves and invite disease. Every planting site you leave empty is capacity you are choosing not to fight for later.
What the build actually teaches
Read back through the four steps and notice how few of them are about plants. The skills are procedural, and they transfer to any hydroponic system regardless of scale:
- Prepare the medium properly — saturated, not waterlogged, and never planted dry in the middle.
- Control the geometry — sponge flush in the pot, pot at the right depth relative to the solution.
- Measure instead of assuming — EC for strength, pH for availability, both on a routine.
- Protect the reservoir — cover it, keep light out, keep the service point accessible.
A commercial nutrient film technique channel on a rooftop and this tabletop tub are running the same four principles with different plumbing. That is precisely why the course pairs the kit build with a guided tour of a working commercial farm on the same day: once you have set the depth on a net pot with your own hands, the same decision is recognisable at production scale.
The course behind the session
WSQ - Basic Urban Farming with Hydroponics (course code TGS-2025053916) is a 1-day, 8-hour class at Beginner level with a 1-hour assessment, held at MEOD Farm, 13 Neo Tiew Harvest Lane. It maps to the SkillsFuture Skills Framework TSC Urban Farming Implementation and Management Control (AGR-FOP-2002-1.1), with two learning outcomes:
- Perform farming activities and equipment operations according to standard operating procedures
- Execute farming operations work in accordance with regulations, WSH practices and housekeeping rules
Alongside the hands-on kit build, the day covers hydroponic system types (deep water culture, nutrient film technique, wick, ebb and flow, drip), growing media, plant nutrition and nutrient solutions, pH and EC monitoring, indoor farming conditions including lighting and humidity, Singapore's urban farming regulations, good agriculture practices and workplace safety.
What it costs
The full fee is $350 before GST. With WSQ funding:
| Who you are | Nett fee | Funding |
|---|---|---|
| Singapore Citizen / PR, aged 21 and above | $206.50 | 50% course-fee funding |
| Singapore Citizen aged 40 and above (MCES), or SME-sponsored | $136.50 | 70% course-fee funding |
GST of $31.50 (9%) applies to the full course fee. Funding is valid from 24 March 2025 to 23 March 2027. Eligible Singapore Citizens can apply SkillsFuture Credit and PSEA against the nett fee, NTUC members may claim UTAP, and employers can tap SFEC with Absentee Payroll support. Completion — at least 75% attendance plus a pass in the assessment — earns a Certificate of Achievement from Tertiary Infotech Academy and an OpenCert (Statement of Achievement) from SkillsFuture Singapore.
Check the next class date and funding eligibility →
Frequently asked questions
Do I get to keep the hydroponics kit?
The class includes hands-on practice with a hydroponics kit, so you build and operate a real system during the session rather than watching a demonstration. Check the current course page or ask us directly about what you take home, since that can change between runs.
Why soak the sponges instead of planting straight into them?
Phenolic grow sponges are hydrophobic when dry — they float and resist taking up water. A sponge that looks wet on the outside can still be dry in the middle, leaving the seed with an air pocket where it needed moisture, and germination fails with no visible cause. Soak until saturated through, then squeeze out the excess so air can still reach the roots.
What is the difference between pH and EC, and do I need to measure both?
Yes, both. EC (electrical conductivity) measures how much dissolved nutrient is in the water — the strength of the feed. pH decides whether the plant can absorb it; most hydroponic crops want roughly 5.5 to 6.5, and outside that range the nutrients are present but chemically locked away. EC alone can give you a strong solution the plant cannot use; pH alone can give you a perfectly absorbable solution that is far too weak.
How often do I need to check the reservoir?
Regularly, and more often than feels necessary at first. Plants drink water faster than they consume the dissolved salts, so as the level drops the EC drifts upward and pH moves on its own. Checking every few days and topping up with plain water (or corrected solution) is the routine that keeps a system alive between crops.
Why does the reservoir need a lid?
To keep light off the solution. Light plus nutrient-rich water grows algae, which competes with your crop for nutrients and fouls the water. The lid also holds the net pots at a fixed depth and slows evaporation, so the concentration you measured stays roughly what the plants get tomorrow.
Do I need any experience to join?
None. The course is Beginner level and most participants have never grown anything before. What it rewards is a willingness to measure carefully and follow a procedure — hydroponics is closer to running a process than to traditional gardening.
Where to go next
The system built on 13 December was a tub, a lid, eight net pots and a meter. That is genuinely all a working hydroponic system needs — everything beyond it is scale and automation, not a different idea.
- Start with leafy greens and herbs. They are fast, forgiving, and let you complete several crop cycles while you are still learning to read the meter.
- Join the next WSQ - Basic Urban Farming with Hydroponics class — from $136.50 nett for eligible Singapore Citizens aged 40 and above.
- Keep a log of pH, EC, top-ups and what you changed. It converts a season of vague impressions into something you can actually learn from.
More on this course: read why hydroponics matters for Singapore from the 6 June 2026 class, and whether you can grow melons hydroponically from the 11 October 2025 run.