You have no items in your shopping cart.
Blog / IoTFlow Tutorial: Create an API Key and Set Up Alerts (with Video)
IoTFlow Tutorial: Create an API Key and Set Up Alerts (with Video)
Short version: in IoTFlow, open API Keys → Create API key, copy the iot_… key (it is shown only once), and send readings to /api/telemetry with Authorization: Bearer <key> plus the device’s deviceId in the JSON body. For alerts, open Alerts → Create rule, pick a device, metric and threshold (for example temperature > 30), and the alert appears within seconds of a reading crossing it. Both buttons need the Admin role — if you see “Ask an administrator to create a key”, that is why.
This question came from one of our own trainers preparing an IoT class, so we recorded the whole flow end to end on a demo account. Watch the 90-second video, then follow the written steps below.
Want to build the sensors that feed a platform like this? Our WSQ IoT and Robotics courses cover Arduino, ESP32, Raspberry Pi and MQTT hands-on, with up to 70% WSQ funding and SkillsFuture Credit eligible.
Before you start: why the buttons are missing
IoTFlow has two roles. Regular User accounts can add devices, build dashboards and send data, but only Admin accounts can create API keys and alert rules. On a User account the Create API key and Create rule buttons are hidden and the page says “Ask an administrator”.
Ask your IoTFlow administrator to change your role to Admin under Admin → Users. It applies within about 30 seconds — just refresh, no sign-out needed. Admins also see an Admin | User toggle in the top bar; keep it on Admin, or the create buttons stay hidden. If you run your own self-hosted copy of IoTFlow, the first account you seed is already an Admin.
API key or device token: which one do you need?
IoTFlow accepts two kinds of credential on the same telemetry endpoint. For a single board, the device token is simpler — it is what the built-in tutorials use.
| Credential | Looks like | Where you get it | Best for |
|---|---|---|---|
| Device token | dev_… | Each device’s page, under Device token | One board talking for itself. No Admin role needed. |
| API key | iot_… | API Keys page (Admin only) | One gateway or script reporting for several devices. Include deviceId in every message. |
How to create an API key in IoTFlow
- Sign in at iot.tertiaryinfotech.com.
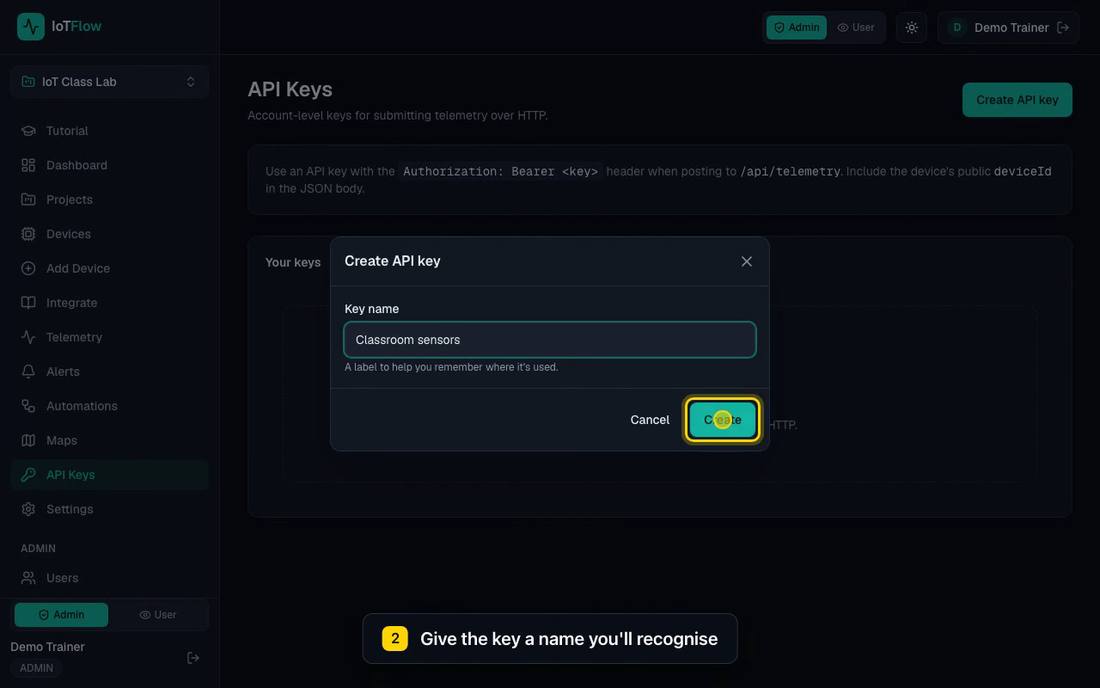
- In the left menu, click API Keys, then Create API key at the top right.
- Type a name you will recognise later, such as Classroom sensors, and click Create.
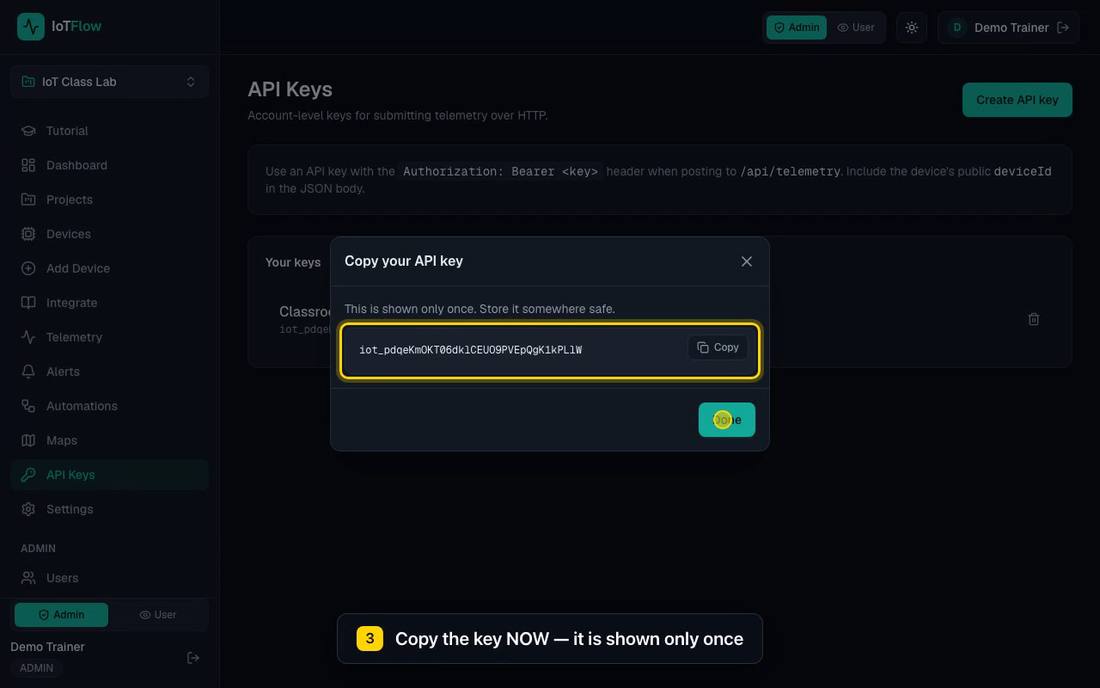
- Click Copy straight away and store the key somewhere safe, such as a password manager or your script’s config file. It starts with
iot_and is shown only once: IoTFlow keeps only its prefix. - Click Done. The key now appears under Your keys with its prefix, creation date and when it was last used.
Lost a key, or pasted it somewhere public? Click the bin icon next to it to revoke it and create a new one. Anything still using the old key stops sending data immediately.
How to send data with the API key
- Open Devices, click your device and copy its Device ID (for example
class-sensor-01). This is the short public ID, not the long internal one. - POST your readings to
/api/telemetrywith the key as a Bearer token and the Device ID in the body:
curl -X POST https://iot.tertiaryinfotech.com/api/telemetry
  -H "Authorization: Bearer iot_YOUR_API_KEY"
  -H "Content-Type: application/json"
  -d '{"deviceId": "YOUR_DEVICE_ID", "temperature": 27.4, "humidity": 63}'
The same call from Python, which works on a Raspberry Pi or any laptop:
import requests

r = requests.post(
    "https://iot.tertiaryinfotech.com/api/telemetry",
    headers={"Authorization": "Bearer iot_YOUR_API_KEY"},
    json={"deviceId": "YOUR_DEVICE_ID", "temperature": 27.4, "humidity": 63},
)
print(r.status_code, r.json())
A successful call returns HTTP 201 with a body such as {"ok":true,"deviceId":"class-sensor-01","stored":2,"alerts":0}. Every number in the body becomes its own metric — here temperature and humidity — and appears on the device page and the Telemetry page straight away.
Teaching or learning IoT? Our WSQ Internet of Things (IoT) Fundamental for Beginners course walks through sensors, MQTT and cloud dashboards in class. Browse all WSQ IoT and Robotics courses to find the right level.
How to set up an alert in IoTFlow
An alert rule watches one metric on one device. The device must have sent at least one reading first, because the Metric list is built from data it has already sent — until then it shows “No telemetry yet”.
- Choose the right project in the selector at the top of the left menu. The Alerts page only lists devices in the current project.
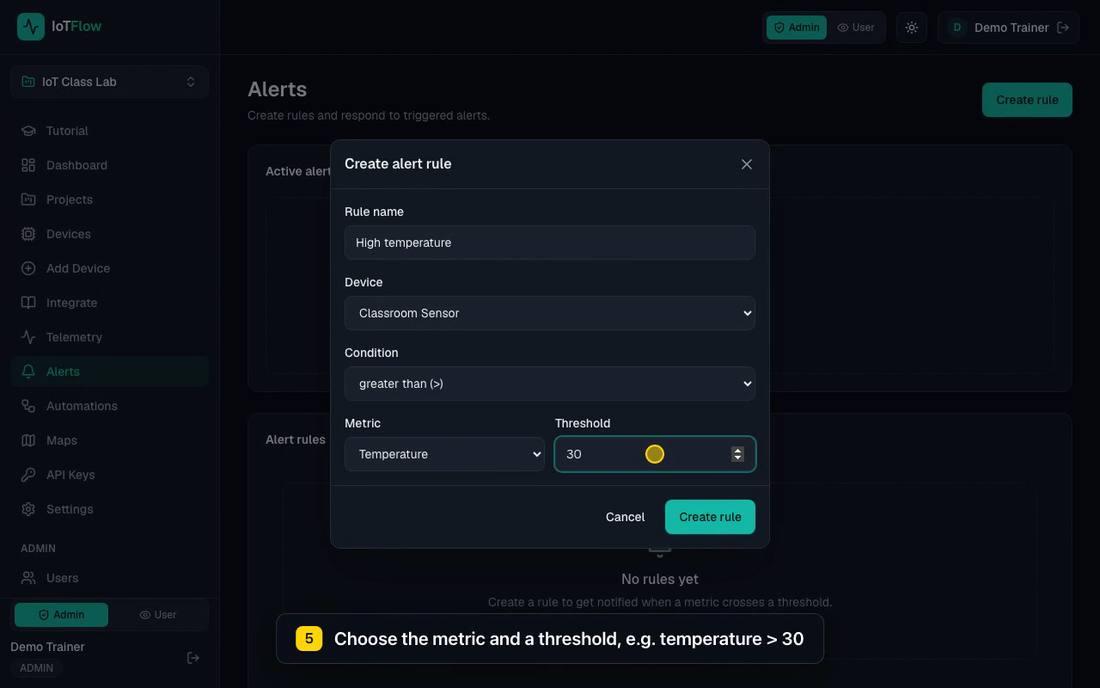
- Click Alerts, then Create rule.
- Enter a Rule name (for example High temperature) and pick the Device.
- Choose a Condition: greater than, less than, greater or equal, less or equal, equals, or device offline.
- Pick the Metric and type the Threshold, for example temperature greater than 30. For device offline you enter how many seconds of silence count as offline instead (the default is 600 seconds).
- Click Create rule. It appears under Alert rules, already enabled; untick it to pause it or use the bin icon to delete it.
Test the alert, then resolve it
Send one reading above the threshold — for example "temperature": 34.5 with the command above. Within a few seconds the alert appears under Active alerts, and in the mobile app. Click Resolve once it is handled. While an alert is active the same rule will not raise duplicates; after you resolve it, the next reading that crosses the threshold raises a new one.
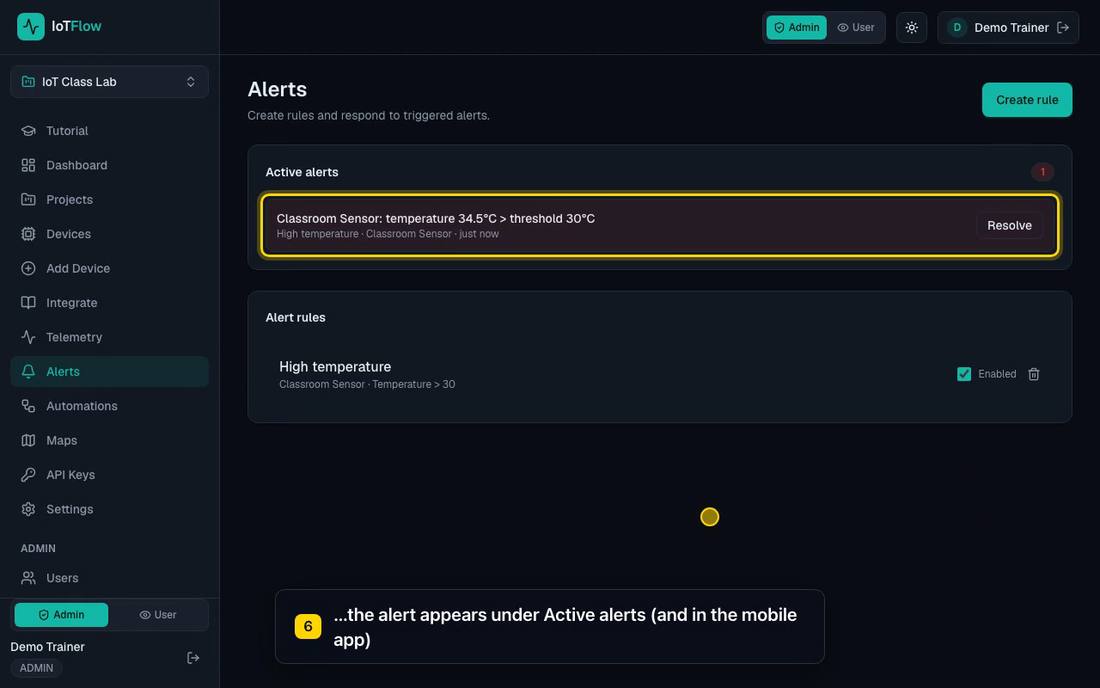
Alerts always show on the Alerts page and in the app. To push them somewhere else — Telegram, Slack, email or a Google Sheet — add an automation on the Automations page with the Alert trigger, which forwards each alert to an n8n workflow.
Get the IoTFlow mobile app
- iPhone and iPad: search for IoTFlow on the App Store, or open IoTFlow on the App Store.
- Android: the app is in Google Play closed testing, so it does not appear in a Play Store search yet. Contact us with the Gmail address on your phone and we will add you as a tester.
- Sign in with the same email and password as the website. The app connects to iot.tertiaryinfotech.com by default. If you registered with “Continue with Google”, set a password first with Forgot password on the website, because the app signs in with email and password.
The app mirrors the web dashboard: live widgets, switches and sliders that control your devices, your device list, alerts and automations.
Troubleshooting
| You see | Cause and fix |
|---|---|
| No Create API key or Create rule button | Your account is not an Admin yet, or the top-bar toggle is on User. Switch it to Admin and refresh. |
| 401 “Invalid API key or missing deviceId in body” | The key is wrong or revoked, or deviceId is missing from the JSON. Check the header reads exactly Authorization: Bearer iot_…. |
| 401 “Unauthorized device” | The deviceId is not one of your devices. An API key only works with devices owned by the account that created it. |
| 400 “Invalid JSON body” | The body is not valid JSON. On Windows Command Prompt, single quotes do not work in -d; use the Python example instead. |
| Metric list says “No telemetry yet” | Send one reading from the device first, then open Create rule again. |
Frequently asked questions
Why does IoTFlow say “Ask an administrator to create a key”?
Creating API keys and alert rules is limited to Admin accounts. Ask your administrator to set your role to Admin under Admin → Users; it takes effect within about 30 seconds without signing out.
What is the difference between an API key and a device token?
A device token (dev_…) belongs to one device and identifies it automatically. An API key (iot_…) belongs to your account and works for all your devices, so each message must name the device with deviceId.
I lost my API key. Can I see it again?
No. IoTFlow stores only the key’s prefix, so the full key is shown once. Revoke the old key with the bin icon and create a new one.
Can I get an alert when a device stops sending data?
Yes. Choose the device offline condition and set how many seconds of silence count as offline. The alert is raised when the device has not reported for longer than that.
Can IoTFlow send alerts to Telegram or email?
Yes. Create an automation with the Alert trigger and point it at an n8n workflow, which can forward the alert to Telegram, Slack, email, WhatsApp or a spreadsheet. Email alerts can also be switched on centrally by the platform administrator.
Is there an IoT course in Singapore that covers this hands-on?
Yes. Our WSQ IoT and Robotics courses cover Arduino, ESP32, Raspberry Pi, MQTT and IoT dashboards hands-on, with up to 70% WSQ funding for eligible learners and SkillsFuture Credit claimable on top.
Keep going
New to IoTFlow? Start with our earlier post, Build Your Own IoT Backend: IoTFlow, a Self-Hosted Platform with a Python SDK, then follow the full tutorial with copy-paste snippets at iot.tertiaryinfotech.com/tutorials.
Ready to build real IoT projects in class? Explore the WSQ IoT and Robotics course catalogue — eligible learners get up to 70% WSQ funding, and Singaporeans can use SkillsFuture Credit to offset the rest.